Welcome to Homegrown Bites by Jake's Run!

Tasty food, lamb meat, jams and jellies, fresh produce, and crochet accessories.


Leave a comment

The seeds have arrived!

What we can’t harvest from our own garden, we order from Mountain Valley Seeds. They provide a great product, fast shipping and NO GMOs. We specifically choose non-GMO options to provide our customers with the healthiest options for locally grown produce. 

  
To me, it’s simply a miracle to watch these tiny seeds grow into plants that feed so many. We’re so thankful to our customers who give us the opportunity to feed their families. 


Leave a comment

Apple cider vinegar

Google apple cider vinegar and you’ll discover a myriad of uses. It can be used as a non-toxic cleaning solution, hair conditioner (my personal favorite), fabric softener, cooking ingredient…  I could go on and on. ACV is my “go to” liquid. I use it for everything. 

Last summer, I read an article (or twelve) on how to make your own apple cider vinegar. I didn’t  believe it could be as easy and simple as the Internet was telling me. 

But it IS!! It really is!

I buy a lot of apples. Sometimes they get eaten quickly, sometimes not. When they get a little mushy, they get made into ACV. You can also use the peels and cores. 

  
HOW TO MAKE APPLE CIDER VINEGAR:

You will need: 

  • Water
  • Apples
  • Sugar
  • Glass jar with ring
  • Coffee filter
  • Knife
  • Cutting board
  • Teaspoon

Directions:

1. Dice organic apples. (You can also use leftover peels and cores).)

2. Place in glass jar. Fill 3/4 full. 

3. Mix 2T. sugar with 2 C. water. 

4. Pour water into jar, covering apples. 

5. Cover with cheesecloth or coffee filter. (I use a coffee filter and the jar ring)

6. Store in a warm, dark place for 4 weeks. (I write the date on the coffee filter)

7. Strain out apple pieces. 

8. Return liquid to jar and cover with same cover. 

9. Put the jar back into the dark place and store for 4-6 weeks, stirring occasionally. 

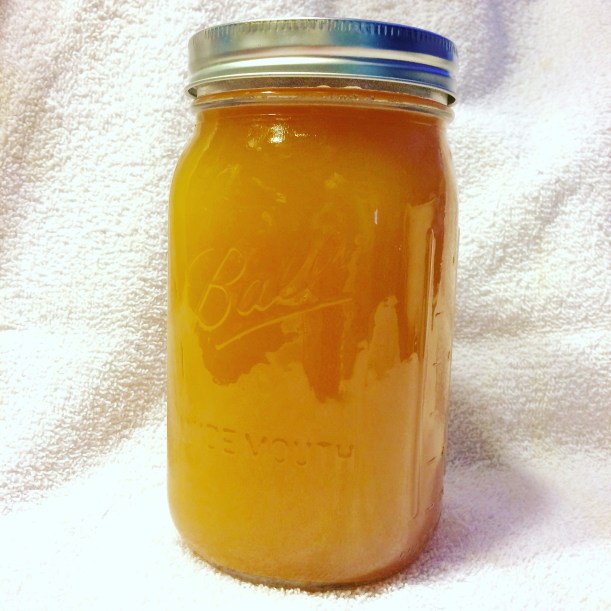
At the end of this time, your apple cider vinegar will be ready to use.

I made a total of three batches in quart jars, which yielded 1.5 quarts of ACV. 

  
I can’t wait to use it, but I’ve saved a portion to be made into rose vinegar this summer when the rose bushes bloom. (Also easy, but that’s another post.)

Until next time…


2 Comments

The 2016 CSA registration is open.

Happy New Year!  So far this winter, we’ve built a shelter for the cow and goat, installed a new watering system for the chickens and ducks, and dramatically increased the land area for the chickens (They’re allowed to free-range, but we have many predators, so their area is predator-proofed for their protection).

Our “To Do” list still includes to build a greenhouse, but it’s now time to open the 2016 season.  We’re scouring our seed catalogs and planning the garden layout.  This is the time to let you know if there’s anything you’d like for us to grow so we can include it.

To reserve your share of this year’s garden, please visit our “CSA – How to Join” tab.

We look forward to meeting you 🙂


Leave a comment

Hello, Fall!

The Fall crops have finally matured enough to be harvested. We’re loving this awesome weather after such a terrible summer. Each afternoon we take a walk to the back of the property where the fall crops were planted. The trees surround us with a rainbow of colors. Fall is my favorite time of year. Cool days, cooler nights, campfires, and sweatshirts are the best!

There’s no place like home 🙂


4 Comments

Jalapeño Jelly :)

We’ve had a great crop of jalapeños this year. So, I thought I’d attempt jalapeño jelly for the first time. It was no more difficult than any other jelly, but since my skin is pretty sensitive to jalapeños and I had to stir it for 10 minutes while it boiled, my hands are burning. 

I’ve never tried it, but I’ve heard it’s good served over a warm block of cream cheese. We’ll see…


Leave a comment

Red Pepper Flakes

When we have extra cayenne peppers we dry them and process them into red pepper flakes.  

A quart of pepper flakes will last us a LONG time.

  1. Wash the peppers and allow to dry. 
  2. Remove tops. 
  3. Line a baking sheet with parchment paper. 
  4. Place in oven on lowest temp (we have an old gas oven with a pilot light that keeps the perfect temp for drying). 
  5. When dried completely, place in air tight storage container until you have enough to process.
  6. * Place dried peppers in food processor and process until desired consistency is achieved (some people use a blender, but I like the consistency from our food processor). *remember that cayenne can irritate your eyes and skin. Use caution and try to avoid breathing in the dust produced by this step. It WILL make you cough, sneeze, nose run, eyes water, etc. 
  7. When desired consistency has been achieved, place flakes in air tight container. Remember to avoid breathing in the dust. 
  8. Pepper flakes are now ready to use. 


Leave a comment

Ready for Fall!

Although the weather has been terrible this year, we’re planting to end the year with a bang! Spinach, kale, chard, peas, squash, sweet potatoes, pumpkins, zucchini, broccoli, beets, acorn squash, spaghetti squash, butternut squash and cabbage are all in the ground. 

Peas and spinach


Chard is coming up nicely.


The kale looks beautiful!


Yellow squash should arrive on the new plants soon


222 freshly planted and watered broccoli and cabbage plants.